September 15, 2022 • Web
WordPress is a content management system (CMS) with built-in blogging functionality. Upon installing WordPress, users are granted access to the Posts screen. Within this area of your admin panel, you can write new posts or edit existing ones.
When you have a page set as the Posts page (See: Settings > Reading) it will dynamically insert a blog feed on this page, which will link to the posts you have published.
Gutenberg Block Editor
Out-of-the-box, WordPress comes bundled with an Editor called Gutenberg.
When using Gutenberg, you utilize “blocks” to create rows of content, which can then be dragged, dropped, and moved around as needed. These blocks can also be saved and reused for multiple posts.
In this article, we’ll be using Gutenberg to outline how to write and publish basic blog posts in WordPress.
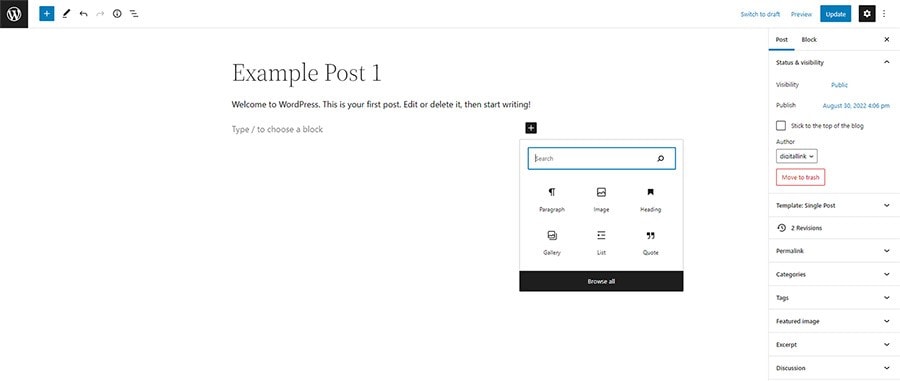
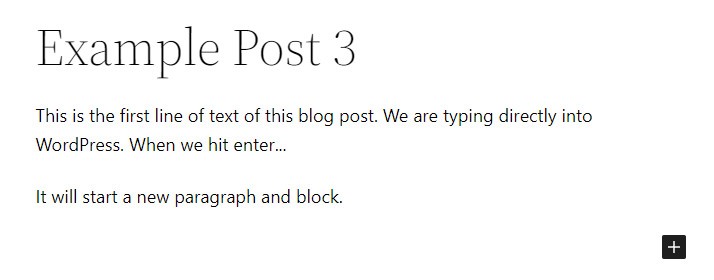
The Add New Post page in WordPress, using the Gutenberg Block Editor
Add New Post
From the Posts menu you can click “Add New” to start a new blog post. The next screen you see will be where you write your content and add assets.
You will type your post title in the first block where it says, “Add title”. Below the title you will find the option to start typing your content or choose to add a block.
Block Options
There are many built-in block elements in Gutenberg. Some of the most used blocks include:
- Paragraph Text
- Heading Text
- List
- Image
- Buttons
- Embeds
To see a full list of the available blocks, you can simply click the plus sign on the block row and choose “Browse all”. Depending on your theme, you may have additional block templates as well.
Tip: You can use elements and preview your post without publishing it live. This means that you will see the post on the front-end of the website, but it won’t be available to regular visitors. This is the best way to see what a block element does, how it looks, and if you’d like to keep using it.
Start Typing
After selecting your title, you can start typing directly in the post or copy and paste from an existing document. Keep in mind that if your original document has embedded styles and formatting, they will be pasted into WordPress as well. In some cases, such as keeping list items, or text formatting such as bold, italic, and hyperlinks, this works well. In other cases, such as copying from a PDF that has been customized for print, you may find that pasting includes odd spacing and broken text.
Tip: To make a direct paste with formatting/styles included, you may know to use CTRL+V on PC or CMD+V on Mac. If you use CTRL+SHIFT+V (or CMD+SHIFT+V) you will paste the text without the embedded styles.
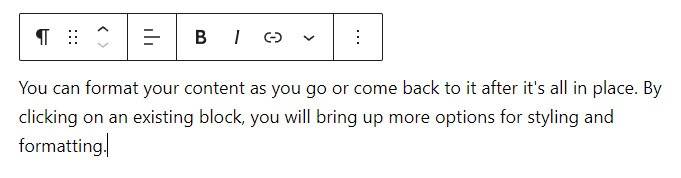
Each time you hit enter in Gutenberg it will create a new block element. This means that new paragraphs of text will be in their own containers.
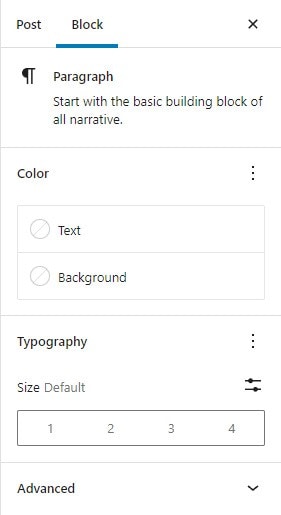
Format and Style your Text
Once you have your post text in place, you can do some further editing to customize your content. Clicking within an existing block will bring up a toolbar that enables you to transform text to a heading, paragraph, list, quote, etc. You can also change the text alignment, bold or italicize your text, add a hyperlink, and other options that resemble what you see in word documents.
There are additional settings available if you click the three dots at the end of the toolbar. From here, you will get a drop-down menu allowing you to copy your text, duplicate the block entirely, move it around on the page, or in cases where you may want to reuse the block in additional posts – you can save it as a reusable block.
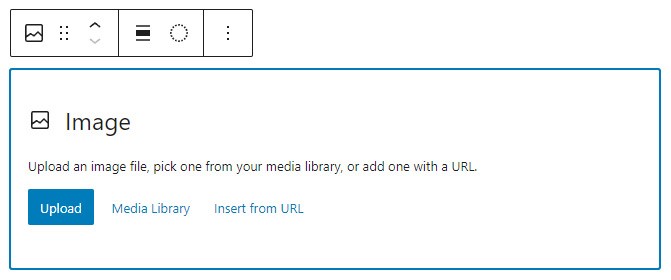
Image Block
If you want to include images within your post, you’ll use the “Image Block” element. From here you can upload the file directly from your computer or use an existing image that is in the WordPress Media Library.
Depending on the block element used, the toolbar mentioned above will have different options in place. In “Image Blocks”, you’ll have additional settings for alignment or applying filters.
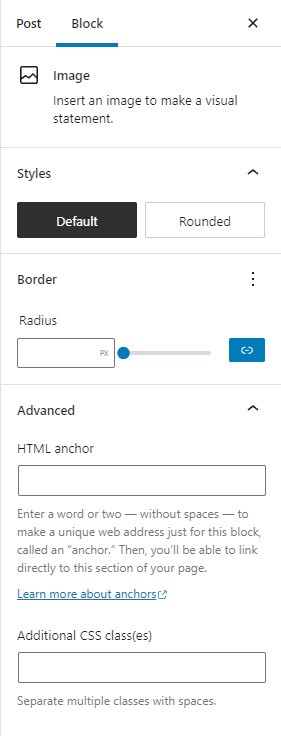
Advanced Block Options
You may notice that on the right side of your screen there is an additional settings menu. When you have selected a block, you will see advanced options that you can apply to individual block elements. These options will also change depending on the type of block you have selected.
Text blocks may include options for changing the text color or text area background, while image blocks may include border styles, such as rounded edges.
Including Post Assets
There is more to your post than the content! It is important to keep your posts well organized, both for internal use but also for visitors to find the content they are looking for efficiently.
When you do not have a block element selected, you will see the Post settings menu on the right side of your screen. From this menu you will input specific configurations for your post that will help with how it is applied to the front-end of your website.
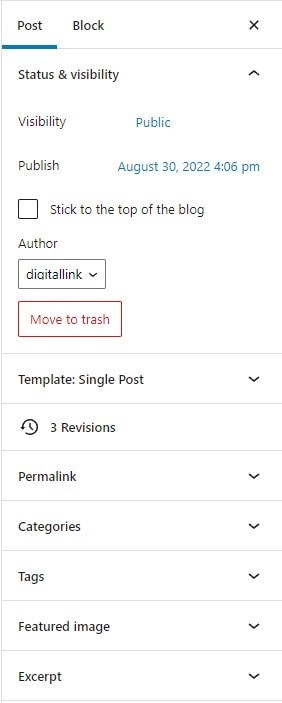
Status & Visibility
In the first area of the post settings menu, you’ll see the heading for the status and visibility of your post. If your visibility is set to Public and the post is published, it will be live and seen on the front-end of your website. You can have the post set to public and still saved as a draft if you’re not ready to publish.
If a post is marked as Private and published, it will only be visible on the front-end of the website to site administrators and logged-in users with the editor role.
You can also password protect your post. At the front-end, all visitors will see a page that asks them to input a password. Once the password has been submitted, the page will refresh to display the post.
Scheduling Posts
Posts can be published right away, backdated, or scheduled to be published in the future by using the Publish settings. By default, posts will be published immediately, keeping the date and time of publishing to the time zone you’ve set in WordPress (See: Settings > General).
Sticky Posts
Typically, blog archive pages will show the most recent post published and then list the older posts afterwards, based on their timestamps. Occasionally, you may have an important post that needs to stay upfront while you continue to publish additional posts. To make a post “sticky”, use the checkbox for “Stick to the top of the blog”. This will cause this post to always appear first in blog feeds.
If you have a team of writers and require an editor to review the post before it’s published live, you can assign the “Pending review” option to your post.
Assigning an Author
Depending on the user profile you’re logged in to, this will become the author listed for the post. Some themes will display the author in each post. If you’re logged into the correct account when creating a post, you likely won’t need to change this setting.
However, there may be times that you need to change the author. For example, if you employ a copywriter for your posts, and they have their own WordPress user, you will want the author changed to the business user so that the business name displays on the website.
This is especially important if your website utilizes archive pages for authors, as these can be indexed by search engines, which will cause the username of the post author to display online.
Permalinks
The permalink is the URL of your blog post – the web address that is entered to navigate to this single post on your website. WordPress will automatically create a permalink based on what you name the title of your blog. In most cases this works fine – especially if you’re optimizing your blog post titles for keywords. However, in some cases you may want to amend the permalink to be more friendly.
For example, if your post title is quite long, you’ll want to keep the URL shorter. Let’s say your post is titled “One Hundred Ways We Choose to Take a Break from the Workday” – you don’t want your URL to read as (yourdomain.com/one-hundred-ways-we-choose-to-take-a-break-from-the-workday), instead you could amend the permalink to read as (yourdomain.com/100-ways-break-from-work).
Categories and Tags
Each blog will be different in terms of what you have categories and tags set up for but maintaining organization of your posts is helpful for both users and search engines. By default, WordPress will apply an “Uncategorized” category, due to the requirement of assigning a category to every post.
You can add new categories and tags directly in the post edit screen. The front-end of your website will then be able to display specific posts on screen depending on the category or tag the user selects to view.
Featured Image
Most themes will insert a single featured image to each post. This featured image is shown in archive pages, such as the main blog page, category, tag, and author pages, or in on-page elements that insert a blog feed. The featured image is also typically what social media sites will grab to display when a link is shared to your post.
Featured images may also be inserted on the page before your post content is displayed. For this reason, it is best not to include the same image you apply as a featured image within your post content, otherwise the same image will display twice on the page.
Like the image block element, when selecting a featured image, you can choose to upload a new one, or select from the existing Media Library.
Excerpts
WordPress will automatically take the first characters of text from the beginning of the article to display as the excerpt on archive pages and blog feeds. If you would like to manually input a different excerpt, you can do so here.
Publishing Your Post
Before publishing your post, run through everything you’ve done to ensure you’re ready for it to live on the internet. In your draft preview, you’ll want to check for things like your hyperlinks are working, text formatting and spacing, or that you have captions for your images. Keep in mind that you can always go back, edit, and re-save the post as needed.
When you’re ready, click that blue button that says “Publish” at the top right of your page! It’s aliiiive!
Did you find this post helpful?
You can read more about WordPress Block Editor. We’re also working on releasing more WordPress How-Tos. Sign-up for our monthly newsletter below to get helpful tips on WordPress and be notified when we publish new posts. Have a question? Let us know by sending an email, or reaching out to us on any of our social media channels!
Liked this article?
We are adding more useful articles to our blog every week! Join our subscribers to stay up to date on digital security, marketing, and social media trends.
By entering your email, you agree to receive our monthly newsletter. You can unsubscribe at any time!